Showing posts with label BREAKFAST RECIPES. Show all posts

SUNDAY MORNING FLUFFY BISCUITS

I have been biscuit "challenged" for many years, so when I'm in a hurry, I usually resort to a tube of commercial rolls and try to jazz them up, but they are pretty unmistakable (and getting expensive!!). 

The last few years, I've tried out a lot of biscuit recipes, in hopes of finding the perfect one; one that is flavorful, light, fluffy and EASY............here is my latest success...YUM!!!

Made with baking powder, baking soda, buttermilk AND yeast, these biscuits are light and fluffy. Hot out of the oven with butter and honey, they are a winner!!!

In a small bowl, mix 1 packet of dry active yeast, a pinch of sugar and ¼ cup of warm water (set aside). After a few minutes, it should be foamy like this:
2½ cups of all purpose flour
½ teaspoon baking soda
1½ teaspoon baking powder
½ teaspoon salt
1 tablespoon of white sugar
6 tablespoons Crisco flavored shortening
1 cup buttermilk (see note)

Stir dry ingredients together and then cut in the shortening until it is about the size of small peas. Stir in the dissolved yeast and buttermilk. Mix well, but do not over mix. Turn out onto floured board and roll to ¾” thick. Cut with a 3” biscuit cutter. Place on parchment paper and bake in preheated 400° oven for 12-14 minutes or until nice and golden. Brush with melted butter when they come out of the oven; they make fantastic breakfast sandwiches!!

NOTE: No kneading needed.

NOTE: This recipe does not work as well if you use butter instead of shortening. I use butter flavored Crisco in all my recipes that call for shortening.

NOTE: Don't be tempted to use your food processor when cutting in the shortening, it will process the shortening to much, it is better to have larger pieces of butter than super fine. I use my pastry cutter.
NOTE: Do NOT add all of the buttermilk at once. Add about 2/3 of it and see if that is enough. Personally, I think 1 cup of milk is too much, but everyone’s flour is different. Just flour your board enough so that the biscuits are not sticky.

NOTE: If you don’t have parchment paper, spray your pan with vegetable spray.

NOTE: Don’t use a twisting motion when you are cutting your biscuits. It seals off
the edges and they won’t raise very high.

BEAR CLAWS

These bear claw pastries are delicious. The dough mixes very easily (no kneading) and the filling for the pastry is equally as easy. The frustrating part is assembly. It is such a sticky dough, that it requires tons of flour on your counter and you have to wash your hands and utensils about every 30 seconds or so to make things work smoothly. Assembly is a little tricky and requires patience; if you can tolerate that annoyance, the final product is worth it. This recipe makes about a dozen nice size pastries, however the dough and filling will keep in the fridge for up to three days, so you do not have to bake them all at once.


PASTRY
1 cup butter
1 tablespoon of dry active yeast
¼ cup warm water
¼ cup white sugar
3 eggs yolks
½ teaspoon salt
(1) small (5 ounce) can evaporated milk
1 ½ cups all purpose flour
Melt the butter and let it cool down to 110 degrees (should only feel good and warm to the touch, not hot). Dissolve yeast in ¼ cup warm water. Mix these two liquids together and add ¼ cup sugar, egg yolks, salt, evaporated milk, and flour. Mix well and cover with plastic wrap and chill in fridge at least 24 hours (or up to three days).


PASTRY FILLING
½ cup butter (room temperature)
1 + 1/3 cups unsifted powdered sugar
2/3 cup all-purpose flour
8 ounces (1 cup) almond paste
1 teaspoon lemon zest
2 egg whites
¾ cup finely chopped almonds
Beat softened butter and powdered sugar until smooth. Add 2/3 cup flour and almond paste. Beat with electric mixer until crumbly and evenly mixed; add lemon zest and two egg whites. Beat until smooth. Stir in ¾ cup finely chopped almonds. Cover with plastic wrap and chill until firm (one to thee days).


ASSEMBLY
Put a nice thick layer of flour on your counter and rolling pin (this dough is STICKY, but you can dust any excess flour off later, with a pastry brush). Roll the dough out to a 20” x 12” rectangle, keeping the edges as straight as possible. Cut the dough (length-wise) into three sections, each about 4” wide.

Flour your counter and hands and roll the almond filling into three 20” “ropes” (the diameter of your thumb). Keep washing your hands because the filling is sticky too! Lay one of the “ropes” in the center of each 20” dough strip and flatten it just a little. Fold the dough over the “rope”, matching the other (cut) edge. Cut each filled 20” strip into 4” pastries (brush excess flour off with a pastry brush) and lay them on a parchment lined baking sheet. With a sharp knife, cut 3 slits in each pastry like this:

Sorry, I forgot to take a photo of this stage, forgive the crude drawing

Flour your knife so it does not stick to the dough and wipe it off often). Use the tip of the knife to separate the “claws” a little. Lightly beat the remaining egg white and brush over the bear claws. top with sliced almonds and sprinkle with sanding sugar. Let pastries raise for 45 minutes and then bake in preheated 375° oven for 15 minutes. Cool on wire rack. Makes about a dozen.


NOTE: I hope I have not scared you away from this recipe. It really is no harder than a simple piecrust, but I felt it only fair to warn you about the sticky dough.
NOTE: I put a simple glaze on some of the pastries and some I left plain. If you have trouble finding sanding sugar (it really adds a special shine and “finish” to baked goods), check Wal-Marts baking isle, near the sprinkles. They sell a Wiltons large grain transparent sprinkle that will work just as well.

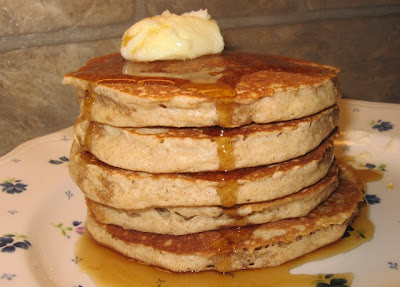
HONEY-WHOLE WHEAT-OATMEAL PANCAKES

JUST IN TIME FOR SUNDAY BREAKFAST!
These pancakes have a wonderful honey-whole wheat flavor that you are not going to get out of an instant "white bread" pancake mix. This batter mixes up in just a couple of minutes, using every day ingredients. I hope you try them.

1 egg
½ cup whole wheat flour
½ cup quick cooking oats
¼ cup white flour
¾ cup milk
2 tablespoons vegetable oil
1 tablespoon honey
3 teaspoons baking powder
½ teaspoon salt
In medium size bowl, whisk the egg until it is lemon colored & a little foamy; whisk in the milk, oil and honey (*see note). Add the flour, oats, baking powder and salt; whisk just until everything is well mixed (don‘t over whisk). Let batter sit for about 5 minutes before cooking.
NOTE: Use a scant 1/3 cup of batter for each pancake.
NOTE: The honey will want to “stay together” and sit on the bottom of your bowl, so make sure you completely mix it into the milk BEFORE you add the flour and oats (that way you won’t over mix the batter).
NOTE: I find that pancakes cook best on a pan that has been sprayed liberally with vegetable spray and then wiped out with a paper towel.
NOTE: You can add ½ cup raisins to this batter if you like raisins. Plump raisins by pouring a little boiling water over them in a small dish and let them sit for 15 minutes then drain well and add to batter.

MAPLE-WALNUT MINI MUFFINS


The combination of maple and walnut just seem to go together in this sweet, moist mini-muffin. They are perfect with a hot cup of tea or if you are on the go. The muffins have a sweet maple syrup glaze on the top.
1 cup light brown sugar
½ cup flour
2 eggs
2/3 cup soft butter
½ teaspoon vanilla
½ teaspoon maple extract
1 cup chopped walnuts
Preheat oven to 350°. Grease and flour a mini muffin pan (or spray with a cooking spray that has flour, like Bakers Joy). Mix the wet ingredients in a medium size bowl and then stir in the dry ingredients, its just that simple. Mix long enough to just get the batter smooth. Make sure you use the MINI muffin pans (not cupcake size). Fill cups with one tablespoon batter each (makes 24). Top each one with a piece of walnut. Bake for 17 minutes.
NOTE: Dusting pan with flour is important.
NOTE: My oven cooked these little gems in 16 minutes
NOTE: Let these muffins cool for five minutes, then use a thin bladed knife to help you gently lift the muffins out onto a cooling rack. Don’t let these cool in the pan because they won’t come out.
NOTE: If you keep these muffins covered, they will stay soft. If you like a more chewy cookie type muffin, don’t cover them.
NOTE: Glaze the tops of the cooled muffins with the following mixture: ¼ cup real maple syrup + 1 tablespoon corn syrup boiled together for about 30 seconds.