Showing posts with label CAKE RECIPES. Show all posts

CREAM CHEESE POUND CAKE

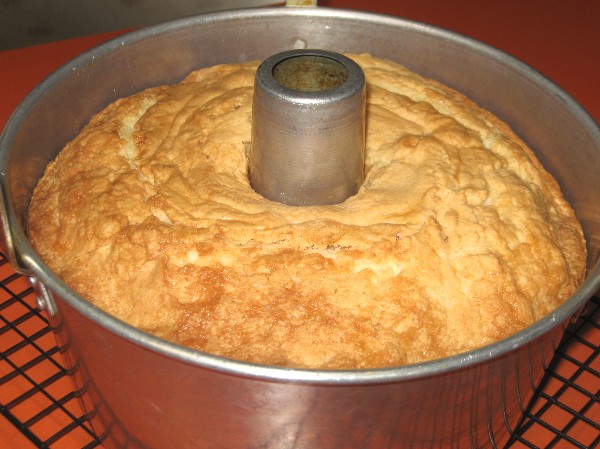
Don't let this unassuming photo deter you from this recipe. This is, by far, one of the best cakes we've had in a  very long time. It is everything you want in a pound cake... it is tender, it has a very fine crumb, it is sweet and rich. Whether you are slicing it up for the perfect strawberry shortcake or serving it with a big scoop of ice cream, this is the perfect cake ...even for the most picky guests!!


1½ cups butter at room temperature
8 ounces cream cheese at room temperature
3 cups granulated sugar
6 large eggs
3 cups cake flour
1/8 teaspoon salt
2 teaspoons vanilla extract
1 teaspoon almond extract

In a LARGE bowl, with electric mixer, beat the room temperture butter for about a minute.  Add the room temperature cream cheese and beat for two more minutes (it should look light and fluffy). It is very important that both of these ingredients are at room temperature.

Gradually sprinkle in the sugar (while your mixer is running) 1/2 cup at a time; beat well.  Add the eggs, one at a time, beating well after each egg. Mix in extracts.

Measure out 3 cups of CAKE FLOUR and 1/8 tsp. salt, then sift it all.  Add slowly to butter mixture, on low speed, mixing well after each addition.

Generously grease AND FLOUR a 10" bundt pan (I used my angel food pan).  Bake in
preheated 300 degree oven for 1 hour 40 minutes, or till toothpick tests clean.

Fairly nondescript looking at this stage, don't let that sway you.  The genius of this recipe is in the taste. The combination of butter and cream cheese makes this cake to die for.

Let the cake cool, in the pan, for 15 minutes before you turn it out, then cover it with plastic wrap, directly on the surface of the hot cake, until it is completely cool. Frost as desired (we like a light maple frosting).

NOTE:  Yes, 300 degree oven is correct.

NOTE: Don't be tempted to grease your pan with vegetable spray. Make sure you grease and flour your pan well (tap out excess flour). This cake tends to want to stick a little, so if you are using an intricate bundt pan, make sure you grease and flour it well.

NOTE: Make sure you sift the cake flour. I know it is a pain, but cake flour tends to clump more than all purpose flour, so this step is important. You CAN make this cake with all purpose flour, but you won't get that very fine crumb that is so delicious.

MANGO CAKE

This cake brings rave reviews and is a nice change from the predictable pineapple upside-down cake. The cake is sweet, very light and tender and the fruit keeps it deliciously moist. We ate it warm, with ice cream after dinner tonight.

Preheat your oven to 350F and spray a round 9" x 2" cake pan with vegetable spray. Line the bottom of the pan with parchment paper and then spray it again.

BOILED SYRUP LAYER (goes under the batter)
1 cup white sugar
¼ teaspoon lemon juice
¼ cup cold water
~~~~~~~~~~~~~~~~~~~~~~~~
Arrange one pound of small diced mango in the bottom of the parchment lined cake pan, and sprinkle VERY LIGHTLY with some cinnamon sugar. Note: I threw in a few maraschino cherry pieces for color.

In a heavy bottomed  sauce pan, stir 1 cup sugar + lemon juice and cold water together. Bring to boil on medium heat, stirring once in a while, until it starts to turn amber. Watch carefully, because once it starts to turn color, because it will darken quickly. After it turns light amber, pour evenly over the mango and set aside while you make the batter.

CAKE LAYER
1½ cups all purpose flour
1¾ teaspoons baking powder
½ teaspoon ground ginger
½ teaspoon ground cinnamon
½ cup whole milk
2 teaspoons vanilla extract
½ cup butter (room temperature)
1 cup packed brown sugar
2 large eggs
.
In a small bowl, mix flour, baking powder, ginger and cinnamon together, set aside. In another small bowl, mix milk and vanilla extract, set aside.
.
With electric mixer, beat the room temperature butter for one minute, or until it is light and fluffy; add brown sugar and beat on high for 3 minutes. Reduce speed and add eggs, one at a time, beating well after each. Make sure you scrape down the sides of the bowl once in a while.

Now you need to mix in the milk mixture and the flour mixture, but make sure you alternate (dry...milk...dry...milk etc.). Scrape down the bowl and give it one final mix but don't mix too long. Pour the batter over the mango and syrup layer.

Bake at 350F for 35 to 45 minutes, or until a toothpick inserted in center of cake comes out clean (it takes 45 minutes in my electric oven). Remove from oven and let the cake cool in the pan for 15 minutes. Run a thin knife around the edge to loosen, then invert on a serving plate and peel off the parchment paper; serve warm. This cake is excellent with whipped cream or ice cream.
NOTE: Do not make this in a spring form pan because the sauce might leak out.

NOTE: You can make this with almost any kind of fruit, blueberries work nicely too.

NOTE: The fruit might appear quite wet when you first invert the cake, but as it cools off, the sauce thickens considerably.

ANGEL FOOD CAKE

Have you ever tried an angel food cake made from scratch? They are a little intimidating, at first, but the flavor and texture is extraordinary and you will never be happy with a bakery angel food cake again. They are worth every bit of effort!!
It is amazing how tall this cake gets!

Read these instructions at least twice before you start baking…then follow the instructions to a "T". This is one cake you shouldn’t experiment with.

1 cup of cake flour
1 ½ cups white sugar (divided)
12 egg whites
1 teaspoon vanilla extract
½ teaspoon almond extract
1 ½ teaspoon cream of tartar
½ teaspoon salt


Preheat oven to 375°. Be sure that your 10” (two piece) angel food pan is TOTALLY FREE of any grease or oil and it needs to be an angel food pan that is NOT Teflon coated. Make sure your mixing bowl, beaters and mixing spoons are all totally grease free. Remember, grease is the enemy when making an angel food cake because the cake is mostly egg whites. The cake needs to “grab onto” the sides of the pan in order for it to raise, and if there is grease (or Teflon), it can’t do that.

Do ahead: Sift 1 cup of CAKE flour with ¾ cup of white sugar and set aside.

In a large bowl, whip the egg whites, vanilla, cream of tartar and salt with an electric mixer, on high, until you get medium peaks (it takes about five minutes). Continue to whip and SLOWLY add ¾ cup of the sugar into the whites. Continue beating until the whites get to the stiff peak stage.

Next FOLD the flour/sugar combo into the whipped egg whites a tablespoon at a time. Make sure you FOLD, this mixture into the egg whites, DO NOT use mixer to do this and DO NOT stir. Gently fold from top to bottom. This process is necessary so you do not deflate the egg whites.

Put the batter into the angel food pan and smooth the top a little. Bake for 45 minutes. When the cake is done, the top will spring back just a little when you lightly touch it and the cake top will be dry to the touch. Remove from oven and immediately invert the pan and cool for a couple of hours. To remove the cooled cake from the pan, use a long slender bladed knife (I like my bread knife) and run it around the sides of the pan in small sawing motions. Next do the same around the center tube of the pan. Lift the cake out and run your knife under the cake, it should then life right off of the pan.
NOTE: Separate your egg whites into a small bowl before you add them to your mixing bowl so you don’t get ANY yolks into the batter.
NOTE: Save the yolks in a clean jar in the fridge. They will be good for a couple days at least.
NOTE: I usually run my utensils through the hottest dishwasher setting before I make this recipe, to insure they are totally grease free.


I hope I haven’t scared you away from trying this cake. It is delicious and worth every bit of effort.

PEACH COFFEE CAKE

If you are cooking for your mother, mother-in-law, wife (or yourself) on Mothers Day, I hope you consider this recipe. Its humble title, “Peaches and Cream Coffee Cake” does not accurately describe it. The base is a vanilla cake, partially baked (25 minutes), then topped with a mixture of sweetened condensed milk, cream cheese, chopped peaches, toasted pecans and a cinnamon streusel topping. It is then put back in the oven for another 35 minutes. It is divine!
2 and 1/3 cups all purpose flour
1 and 1/3 cups white sugar
¾ teaspoon salt
¾ cup butter flavored Crisco shortening
2 teaspoons baking powder
¾ cup milk
2 eggs
1 teaspoon vanilla
(1) 3 ounce cream cheese (room temp)
(1) 14 ounce sweetened condensed milk (NOT evaporated milk)
(1) 29 ounce can peaches well drained (reserve syrup)
1/3 cup reserved peach liquid
2 teaspoons cinnamon (divided)
1 cup toasted pecans (divided)
1/3 cup brown sugar (firmly packed)
Preheat oven to 350° and spray a 9” x 13” baking dish with vegetable spray (set aside).

In a mixing bowl, combine flour, sugar and salt; cut in the Crisco until crumbly. Remove one cup of these crumbs and set them aside. To the rest of the crumbs, add baking powder, milk, eggs and vanilla. Beat on medium speed two minutes. Spread batter in prepared 9”x13” baking pan and bake 25 minutes (cake will be only partially baked).

While cake is baking, beat the cream cheese until fluffy. Gradually beat in sweetened condensed milk and peach juice. Chop the drained peaches and add them to the milk mixture. Stir in ONE teaspoon of cinnamon and half cup of toasted nuts (set aside).

Make the streusel topping by combining the 1 cup of reserved cake crumb mixture, ½ cup of toasted chopped pecans and ONE teaspoon of cinnamon (set aside).

After the cake base has baked for 25 minutes, remove it from the oven and pour the peaches and cream mixture over it, spreading the peaches evenly. Top the peaches and cream mixture with the streusel topping and return to the oven for 35 more minutes

NOTE: When cutting the Crisco into the flour and sugar, try to get crumbs as fine as possible. I use my pastry cutter to get most of it worked in, but then I use my electric beaters and it will turn the crumbs into a very fine powder, which is what you want.
NOTE: I have never tried to substitute butter for the Crisco in this recipe.
NOTE: This cake is excellent, served warm (or room temperature) with whipped cream or ice cream.

Happy Mothers Day to all of you Mom’s out there! This Sunday is also my birthday (my birthday lands on Mothers Day every 7th year), so it will be a great day for me too!

Peach on Foodista

NO-BAKE CANDY CAKE


Follow Me on Pinterest
I found this idea on a web site a couple of years ago (long before I was aware of the blogging world). It is a fun (and easy) project which can be tailored to any age, holiday or special occasion. Need a gift for someone at work or school? Make them a small version. Make a huge version for a table centerpiece at a teenager’s birthday party. The possibilities are endless.

The “candy cake” pictured was made with a 9” cardboard circle for a base (I used a Wilton cake circle I had). Since the candy you are going to fill this with is heavy, the base cardboard needs to be pretty rigid, so…if in doubt, double-up your cardboard. If you double up your cardboard, wrap it in foil to disguise it.

Next, I hot glued two (flat) 8” Styrofoam wreath circles on top of each other, wrapped them in wide ribbon and glued them to the cardboard circle base. Now you should have a flat base with a ribbon wrapped “lip” around the outer edge of the base.

Next, attach mini-candy bars or mini-boxes of candy to the outside of the “lip” by placing a SINGLE small dot of hot glue on the back of the candy wrapper (use my photo as a guide). Now fill the hollow area inside of the Styrofoam wreaths with loose, wrapped candies.

Next, think about decorating the flat top of the Styrofoam “lip”. You can either glue more candy to it, or push lollipops, blow pops, or any candy on a stick, into the Styrofoam so it will add height.

NOTE: Plan ahead and make sure all of your candy bars are facing in the same direction. Keep your design or color theme in mind when you are choosing candy bars.

NOTE: If you are using hot glue on chocolate bars, remember just one little dot will suffice and if you are concerned about it, freeze them first.

NOTE: Do not use any unwrapped candy.
NOTE: If giving as a gift, this looks especially festive if you wrap it in clear cellophane and decorate it with lots of curly ribbons.

The hardest part of this project is not snacking on the candy while you are constructing it.
These little pineapple upside-down cupcakes are super rich-gooey-yummy. They are easy enough for every-day eating and pretty enough for ANY holiday table. They are SO tasty (and portable) that they disappear very quickly. Recipe makes two dozen.


Spray your cupcake pans with vegetable spray. Line the bottoms of the cupcake pan with parchment (or wax paper) circles and spray lightly again. Preheat your oven to 350°.

TOPPING
6 tablespoons butter
1 cup brown sugar packed
2 tablespoons corn syrup
(1) 14 oz. can crushed pineapple (drained)
maraschino cherries quartered

Drain crushed pineapple completely (squeeze it as dry as you can). In a small saucepan, heat the butter, brown sugar, corn syrup and drained pineapple until the sugar is dissolved (stirring constantly). Remove from heat and set aside. Drain and quarter a small jar of maraschino cherries. Put the quartered cherries in the bottoms of the cupcake pan. Pour topping over the cherries (dividing equally between the 24 cupcakes). Set aside.

CAKE PART
3 eggs
2 cups sugar
1 cup vegetable oil
1 cup sour cream
2 teaspoons vanilla extract
1 teaspoon butter extract
2½ cups flour (spoon into cup, level off)
½ teaspoon baking soda
1 teaspoon baking powder
½ teaspoon salt

Beat eggs and sugar until thick and lemon colored. Beat in oil, sour cream and extracts till smooth. Add dry ingredients and mix until smooth. Fill each cupcake cup 2/3 full. Bake at 350° for 25 minutes or until cake tests done. Cool pans on rack for 5 minutes. After five minutes, loosen sides of cupcakes with a thin knife and gently turn cupcake pans over onto parchment paper. Let the pan (and cupcakes) stay upside down for a few minutes. Lift pan off (see note).
NOTE: No matter how well you grease the pan, SOME of this fruit-sugar mixture will stick/stay in the pan. Don’t panic, just scoop it out and “frost” the bottom the inverted cupcakes.

MINI-DISCOVERY
My hubby loves pizza…the cheesier and meatier the better (click here for my pizza recipe). Personally, I prefer a vegetable pizza but it always seemed to be missing something (like pepperoni lol). Tonight, I made my usual veggie pizza but I added black beans. Yowza, it really made a huge difference. For some strange reason (maybe it’s the texture?) the pizza with black beans was SO satisfying and I didn’t even miss the “pizza meat” (like I usually do). If you haven’t tried black beans on your veggie pizza yet…give it a try!

Mushroom, onion, red bell pepper, broccoli and black bean pizza


COLD OVEN POUND CAKE with BUTTER RUM GLAZE

My recipe interests seem to fall into three main categories. First, there are the “some day” recipes, which are generic recipes that sound good and “some day” I hope to try them. Next are the “have promise” recipes, which are recipes that I have tried a few times but they still need a little tweaking. Finally, there are my “go to” recipes, which are ones I have no reservations about; I know they will turn out great. The Cold Oven Pound Cake is one of my “go to” recipes. It is sweet, dense, moist, buttery and easy to make. It is truly a great recipe.

DO NOT PREHEAT YOUR OVEN
3 ¾ cups powdered sugar
2 sticks (half pound) of real butter (do not substitute)
4 eggs
3 cups flour (sift into cup and level off)
1 cup warm water
1 teaspoon baking powder
2 teaspoons vanilla extract
1 teaspoon butter extract (don’t leave out)

Cream butter in large electric mixer bowl. Add powdered sugar and mix well. It will seem very dry at first, but it WILL cream together. Beat until very fluffy (to the consistency of a good frosting) it will take about 3 minutes. Add eggs, one at a time, beating well after each addition. Scrape walls of mixing bowl down between each egg. Add extracts and mix well.

Sift flour directly into a measuring cup and level it off with a knife. Put three of these cups into a small bowl and mix in baking powder, set aside. Next, you will be adding the flour mixture to the butter mixture, alternately with the warm water. You will do this step in thirds (1/3 four + 1/3 water, etc.). Scraping down the bowl walls between each addition. Mix well. Pour batter into a well-greased and floured bundt pan and put into a COLD oven. Turn oven to 350 and bake for 1 hour and 5 minutes. Cool cake in pan about 5 minutes before turning out. Wrap hot cake with plastic wrap and let cool to room temperature. Glaze cake.
BUTTER-RUM GLAZE
¼ cup butter
5 tablespoons water
¾ cup granulated sugar
1 teaspoon rum extract
Mix all ingredients and boil for 3 minutes. Spoon over cake.
NOTE: Do not let this glaze boil like crazy. Bring it to a boil and then reduce the heat so that it is still boiling, but not going crazy. This glaze will be very thin after 3 minutes of boiling and will thicken as it cools. In this photo, I coated the cake with a thin glaze (the shiny part) then came back a few minutes later and did a decorative drizzle with the thickened glaze.

MAPLE-WALNUT MINI MUFFINS


The combination of maple and walnut just seem to go together in this sweet, moist mini-muffin. They are perfect with a hot cup of tea or if you are on the go. The muffins have a sweet maple syrup glaze on the top.
1 cup light brown sugar
½ cup flour
2 eggs
2/3 cup soft butter
½ teaspoon vanilla
½ teaspoon maple extract
1 cup chopped walnuts
Preheat oven to 350°. Grease and flour a mini muffin pan (or spray with a cooking spray that has flour, like Bakers Joy). Mix the wet ingredients in a medium size bowl and then stir in the dry ingredients, its just that simple. Mix long enough to just get the batter smooth. Make sure you use the MINI muffin pans (not cupcake size). Fill cups with one tablespoon batter each (makes 24). Top each one with a piece of walnut. Bake for 17 minutes.
NOTE: Dusting pan with flour is important.
NOTE: My oven cooked these little gems in 16 minutes
NOTE: Let these muffins cool for five minutes, then use a thin bladed knife to help you gently lift the muffins out onto a cooling rack. Don’t let these cool in the pan because they won’t come out.
NOTE: If you keep these muffins covered, they will stay soft. If you like a more chewy cookie type muffin, don’t cover them.
NOTE: Glaze the tops of the cooled muffins with the following mixture: ¼ cup real maple syrup + 1 tablespoon corn syrup boiled together for about 30 seconds.